31 Days To A Much Improved You – Tip #22 Add These Four Ab Exercises To Your Daily Routine

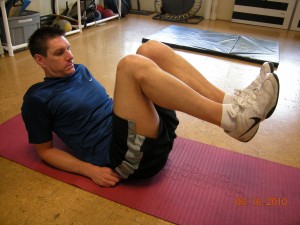
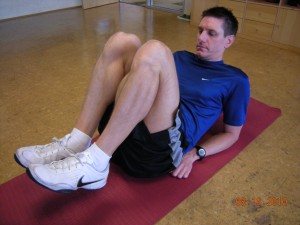
Reverse Crunch - Start Position

Reverse Crunch – Start Position

Reverse Crunch – Finish Position

Reverse Crunch

The Reverse Crunch will help you to reestablish your ability to contract you abdominal muscles. It will also help to increase the strength of your lower abs. Start in a lying position on your elbows Bend your knees to 90 degrees. Leave your heels on the ground and lift your toes. Before you start to lift your legs off the ground you need you go into a posterior pelvic tilt.  If you were wearing a belt, tilt your pelvis back so that belt buckle would get closer to your belly button. Your lower back should flatten out into the floor a little. Hold that pelvic tilt position during the entire exercise. Now lift your heels off the floor until your shins are parallel to the floor. Then slowly lower your feet back to the floor. If you lose the pelvic tilt, reset it before performing the next repetition. If this exercise is easy you are probably not maintaining the pelvic tilt. If your stomach or chest bows forward, that is a sign that you are losing the pelvic tilt.


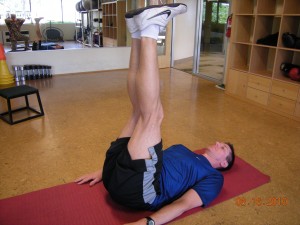
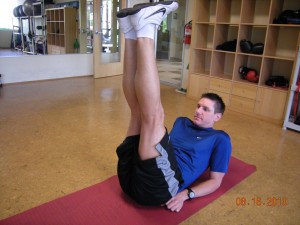
Elevation - Start Position

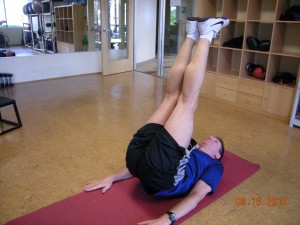
Elevation - Finish Position

Elevations

This is a more dynamic abdominal exercise. Start in a lying position with your hands by your side. Lift your legs so that they are perpendicular to the floor; straight up and down. From that position lift your hips, knees and heels straight up toward the ceiling.

In the “Finish” photo I exagerated the hip lift so you can see that your hips should be coming off of the floor. In reality you want to avoid having your feet move forward toward, or over your head. Your hips should only lift about 1-3 inches off of the floor.  If this is easy you are probably swinging your legs a little too much. Return to start position and repeat.

.

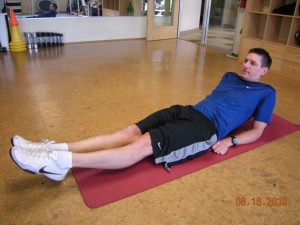
Leg Circles - Start Position

Leg Circles - Position 2

Abdominal Leg Circles

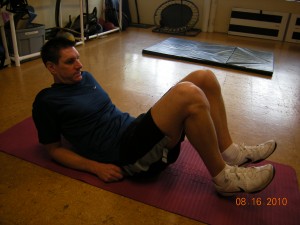
For this exercise there are three position. Please check the third picture below for this description to make sense. Start in the same position as the Reverse Crunch. Set your pelvic tilt. Extend your legs out straight and lift your feet a couple of inches off the ground. With out touching the ground slide your heels along the floor toward your hips. Then straighten your legs and lower your straightened legs back to the start position. After completing one set use the same exact positions but rotate your feet in the opposite direction.

Lift your straight legs off of the floor unilt your legs are perpindicular to the floor. Bend your knees, then press your heels away from your body. Back to the starting position.


Leg Circle - Position 3


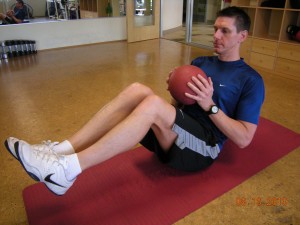
Medicine Ball Twist - Start Position

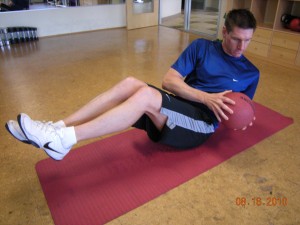
Medicine Ball Twist - Finish Position

Medicine Ball Twist

Balance on you tailbone (boat pose/coccyx balance). Hold a medicing ball in both hands. Keeping it close to your body rotate your shoulders as far as you can. Rotate in both directions.

A common mistace is to have very little shoulder rotation and to move the ball from side to side with your hands.

The obliques, the muscle we are trying to strenghten with this exercise rotate the trunk/spine. So if we want to strenghten them properly our shoulders must turn.


Add these four abdominal exercises to your daily routine. Do them at the same time as the four Core exercises that I introduced in Tip #9. Build up to doing two sets of each. 25 Repetitions each for the Reverse Crunch and Elevations. 15 Leg Circles in each directions. And do as many Medicine Ball Twists as you can.

Watch the video below to learn more on how to perform these exercises correctly. I’ll be back tomorrow with Tip #23


[youtube]http://www.youtube.com/watch?v=8vcF8qYZZGw[/youtube]


Fitness Tip #19 of #31 Get Your Cardiovascular Exercise

Ok I know you’ve been walking for an hour each and every day. And that definitely counts as cardio. But we’re going to ramp things up a bit and develop a more structured cardio program for you. The goal with this structured, intentional cardiovascular program is to begin to increase the amount of time spent with an elevated heart rate. By increasing the intensity of your program you’ll really begin to realize the benefits of being aerobically fit. Here’s how we are going to do it.

You’ll still go for one hour walks every other day. On the day that you don’t go on the walk you’ll add and shorter (20-30 minute) workout at an increased intensity. So how are we going to measure intensity?

Easy, with your heart rate.

This can get a little bit technical but I’ll keep it very simple for you.

Here are some general guideline for you to follow.

Moderate intensity = 50%-65% of your max heart rate
Medium Intensity = 65%-75% of your max heart rate
High Intensity = 75%-85% of your max heart rate

How do you figure your exercise heart rate? Use this formula;

220 – (Your age) X (% of Max heart rate) = Target Heart Rate (THR)

Follow this Example, A 42 year old who wants to exercise at 65% of Max

(220 – 42) X .65 (65%) = THR
178 X .65 = 115

So a 42 year old should exercise  with a heart rate (THR) of 115 beats/minute if the goal is to workout at 65% of maximum.

To calculate your heart beat, simply take your pulse for 15 seconds and multiply by 4. It’s actually easier to double that number twice. So if you take your pulse for 15 seconds and you double it twice you want to end up with a heart rate of 140 beats per minute (in our example, your THR will vary).

So here is the goal for you for this tip. Increase your cardiovascular fitness so that you can maintain a THR of 65% for 30 full minutes. If you can’t do that then I want you to do intervals until you can.

Here is the interval plan

Week 1 Four minutes at your normal walking pace one minute at 65%
Week 2 Three minutes at your normal walking pace 2 minutes at 65%
Week 3 two minutes at normal waking pace 3 minutes at 65%
Week 4 one minute at normal walking pace four minutes at 65%
Week 5 30 minutes at 65%

Ok here the disclaimer

Always warm up for 5-10 minutes prior to the increased intensity exercise. You can stick with the same exercise just perform it at a lower intensity. The above schedule is just a general guideline it may be to conservative for some people and to aggressive for others. Use this strategy to know when it is time to move on. You’re heart rate should return to your normal walking level prior to the next bout of intense exercise. If it doesn’t keep working at that level before moving on.

What type of exercises should you be doing. The simple answer is anything you want.. If you’re walking you may find that you’ll need to jog or run to get your heart rate up to 65%. If you’re fine with running stick with it, just make sure you get a great pair of running shoes. If you want to avoid running then you should probably find a fitness center for your cardiovascular workouts. It’s easy to increase the resistance or elevation on cardio machine to increase your heart rate without running.

You can choose any type of exercise that you like. We’re training heart rate here not movement pattern so you can even do something different each time.

Here is a list of great CV exercises

1. Walking
2. Jogging/Running
3. Swimming
4. Cycling
5. Stair Climbing
6. Elliptical Trainer
7. Aerobic classes (will be tougher to regulate THR)

So pick an activity that you like and every other day you’ll replace your 1 hour walk with more intense cardiovascular exercise.

You’ll experience

1. Increased energy
2. Increase metabolism
3. improved lung function
4. Greater aerobic capacity
5. Decrease resting heart rate
6. All sorts of other really cool physiologically things!

Lets admit one thing here, this tip is awesome. And don’t worry, once you can walk every other day for one hour and do 30 minutes of cardio at 65% of your max you’ll still need to keep progressing. I’ll have a ton of info for you on the site to teach you how….

And I’ll be back tomorrow with fitness tip #20

Fitness Tip #18 of #31 Proper Technique And Injury Prevention

In my humble (OK, expert) opinion I would rank proper exercise form as the second most important factor in having success with your fitness goals. What’s the most important you ask? I’ll never tell! Ok, just kidding. The most important component to being successful is consistency. If you follow all my advice to the letter and have perfect form on every rep of every set on every exercise, but you only do it once or twice each month, you won’t see any results. Hopefully this is so obvious to you that you’ll understand why I didn’t even include it as a tip.

Anyway back to proper technique. When you perform an exercise incorrectly you end up emphasizing muscles other than were originally intended to be emphasized. The end result of this is that you’ll either develop strength and flexibility imbalances or you will exacerbate the imbalances you already have. When you have flexibility and or muscle imbalances you typically will have some pain, stiffness or muscle discomfort (think low back pain). Plus you put yourself at greater risk of injury when you engage in physical activities prior to addressing these imbalances.

Here’s the beauty of exercise. When done correctly it will fix your strength and flexibility imbalances. This will decrease your pain and also decrease the likelihood of experiencing an injury.

Not only will doing exercises incorrectly lead to imbalances: it can also create faulty movement patterns. Once faulty movement patters are established it can take a ton of work to correct. In fact you can develop a faulty movement pattern in as little as 300 repetitions. But it can take over 5000 repetitions to correct a faulty movement pattern.

So it’s always easier to learn proper technique when you are first starting to exercise. Trust me you’ll be rewarded for the rest of your life.

So how do you ensure that you’re doing things correctly. First of all listen and watch very closely to the videos I’ve included in this program. That is a great start. Second find a trained professional in your area and work with them for a short period of time. Tell them your goal up front. You are there to learn as much as you can about proper technique as fast as you can, then you plan to work out on your own.

Depending on your income level, personal trainers can be expensive. But the investment is well worth it.

Oh yeah! Check back periodically with Fitness Know How Headquarters, I’ll always be adding new information.

I’ll check back with you tomorrow with another tip…

31 Days To A Much Improved You – Tip #17 Add 4 More Exercises To Your Resistance Training

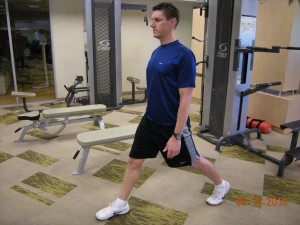
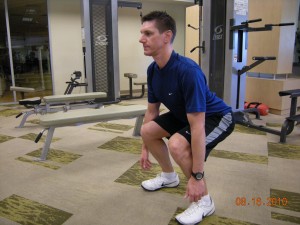
Lunge - Start Position

Lunge - Start Position

Lunge - Finish Position

Lunge

The Lunge is a great lower body exercise. Start with your feet about shoulder width apart, step back with one foot maintaining that width between your feet. Your feet will remain in place during a stationary lunge. You should have more weight on your front foot. You should be on the ball of your back foot with your heel pointing toward the ceiling. With your upper body tall and sternum lifted you are going to lower your hips and upper body straight down toward the ground. You do this by allowing both knees to bend. Stop before your back knee hits the ground. Return to the start position by pushing through the heel of the front foot. It’s important to move up and down and avoid the natural tendency to drift forward as you descend. Repeat with the opposite leg forward.


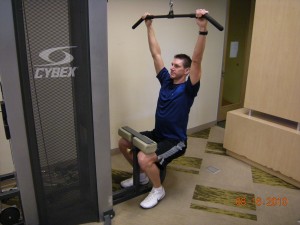
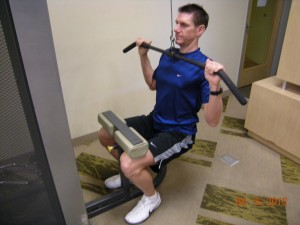
Lat Pulldown Start Position

Lat Pulldown - Finish Position

Lat Pulldown

The Lat Pulldown is a good upper body exercise that will help to strengthen your back. Grab the bar with an overhand grip with your hands slightly wider than your shoulders. Lean back slightly to avoid hitting your nose with the bar. Pull the bar straight down to your collar bone and squeeze your back. Return the bar to the start position. Avoid allowing your shoulders to elevate as you pull the bar down. Don’t pull the bar lower than collar bone level and avoid rocking back and forth as you perform the exercise.


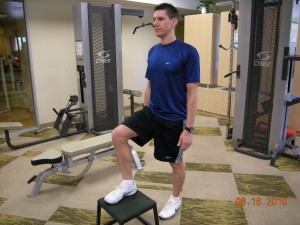
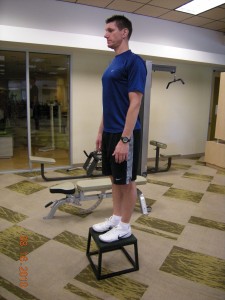
Step Up - Start Position

Step Up - Finish Position

Step Up

The Step Up is great because it mimics an important daily activity, walking up stairs. It also helps with balance. Start with one foot on the floor and one foot on the step. Press through the heel of the foot that is on the step and stand all the way up before placing your other foot on the step. Perform all of the Repetitions on one leg then the other. In other words, leave the foot of what ever leg you are exercise on the step until the set (for that leg) is done. Then switch legs. Hold Dumbbell in your hand or use a higher step to increase the intensity of the exercise.


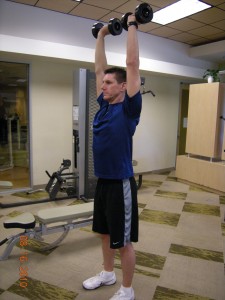
Arnold Press - Start Position

Arnold Press - Finish Position

Arnold Press

OK, this is called an Arnold Press because Arnold Schwarzenegger supposedly invented it. It’s basically a Dumbbell  Military Press, but with some shoulder rotation. This exercise will help to increase your shoulder strength. Hold the dumbbells at collar bone level with your palms facing your body.  Press the dumbbells to the ceiling while simultaneously rotating your palms 180 degrees, so they are pointing forward at the finish position. Return your hands to the start position


Add these for resistance training exercises to the four that I introduced in Tip #12. Do all eight exercises 3 times each week, always resting a day in between workouts. Check out the video below to learn more about how to perform these exercises correctly. I’ll be back tomorrow with Tip #18


[youtube]http://www.youtube.com/watch?v=_IwKIVSoCzw[/youtube]
Fitness Tip #15 of #31 Take The Stairs (No elevators/escalators)

Hope your goal setting was an awesome experience for you yesterday. So you should be totally fired up about getting going today. This tip you’ve heard before, take the stairs instead of escalators and elevators. This is right in line with an earlier fitness tip (Park in the furthest parking spot every place you park). By taking the stairs you are going to increase your daily energy expenditure.

Now I know the extent at which you increase activity levels will vary considerably based on how often you encounter elevators and escalators in your daily life. If you don’t today is like a “free pass” day. But if you do your energy expenditure could go through the roof (not literally) with this tip.

Stairs are awesome. You’ll increase you aerobic function and you’ll build considerable strength in your legs just by changing this one habit.

If your co-workers ask what you’re doing, tell them. This will show them you’re serious about making positive changes in your life.

Have fun with this one…see you tomorrow

31 Days To A Much Improved You – Tip #12 Add These Four Exercises To Your Routine

Squat - Starting Position


Squat - Starting Position

Squat - Finish Position

Squat 

Start in a standing position with your arms by your side and your feet about shoulder width apart. To Perform a squat correctly it helps to pretend that you are sitting down in a chair. So your hips (butt) need to move back and you begin to lower your upper body toward the floor. To counter balance your hips moving back you’ll need to lean forward at the waist. It’s important to keep your back flat, avoid rounding it. At the end position your thighs should be parallel to the ground and your chest should be pointing toward the wall in front of you and not toward the floor. Your knees can move forward slightly but should not move forward of your toes. Push through your heels and return to the starting position. To increase resistance hold dumbbells in your hands.


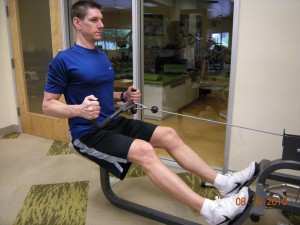
Seated Row - Start Position

Seated Row - Finish Position

Seated Row 

The seated row is a great exercise to strengthen the muscles of the upper back. It’s very helpful in improving posture. Ideally you want to use a handle that is at least shoulder width. Grab the handle and sit up tall, your shoulders should be down, your arms fully extended, your legs straight but not locked at the knees. Pull the cable from the start position to the finish position. Your hand should end up near the bottom of your ribcage. Squeeze your shoulder blades together. Avoid shrugging you shoulders toward your ears. Also your upper body should remain still, you shouldn’t rock back and forth with each repetition. Return the cable to the start position.


Bench Dip - Start Position

Bench Dip - Finish Position

Bench Dip 

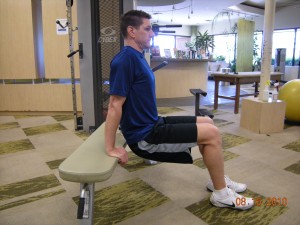
The Bench Dip is an upper body exercise that focuses on the Chest, Shoulders and Triceps (back of the arm). The good thing about the Bench Dip is that you don’t need to be at a gym, you can use a chair at home. Start with you hands on the bench, palm down, fingers forward. Your hand should be next to your hips. Slowly lower your hips toward the ground. Your elbows should move behind your body and not out toward the side. Get a good stretch on your shoulders and chest, then push yourself back to the starting position. Make sure to use your arms and not your legs. In these pictures I’m showing a beginner Dip, with my legs bent. The straighter your legs are the more advanced the exercise becomes.


Dumbbell Chest Fly - Start Position

Dumbbell Chest Fly - Finish Position

Dumbbell Chest Fly 

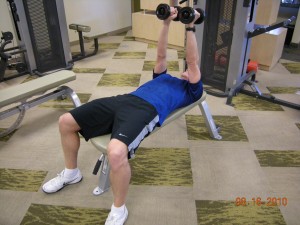
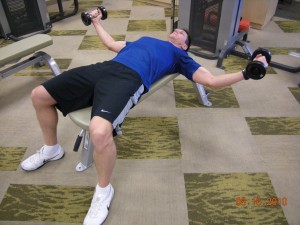
 The Dumbbell Chest Fly will help to strengthen your pectoral (chest) muscles and the front of your shoulders. I’ve selected it because you also can stretch out your chest, which helps to promote good posture. Lye flat on a bench with your arms directly above your chest and your palms facing each other. Your arms should be straight but don’t lock your elbows. There should be no movement at the elbow during this exercise. Slowly lower the dumbbells toward the ground until you feel a moderate stretch in your chest. Return the dumbbells back to the start position.


Perform these 4 exercises 3 times each week, every other day. Always take a day off between resistance training workout (if you’re working the same muscle groups). The goal is to build up to 3 sets of 15 repetitions. Start with one set. If you are not sore or have minimal soreness add another set to your next workout. Once you can perform 3 sets of 15 repetitions, increase the weight. When performing weight training exercises you should breath out when you exert the lift and inhale when your return the weight.

Watch the video below to learn more and I’ll be back tomorrow with Tip #13


[youtube]http://www.youtube.com/watch?v=i_Kml9_iQUY[/youtube] 
Fitness Tip #11 of #31 Park In The Furthest Parking Spot From The Entrance

Sometimes making simple daily changes adds up to huge gains in our health. Our daily activities account for 15-30% of our energy expenditure each day. Plus by increasing or daily expenditure our resting metabolic rate (energy we expend during rest) increases as well. The goal with this Tip is to maximize every opportunity to increase our daily expenditure.

Sitting in a car is resting, walking is not. So pull into the parking lot, find the first open spot, park in it and start walking.

But what if you’re late? RUN, it isn’t going to kill you! Just kidding. Play a little game with this tip. Pay attention to the cars that pull into the same parking lot in front of and behind you. See how much ahead of or behind you they are when you get into the store/or work/bank whatever. I bet you’ll get there about the same time. If not RUN, it isn’t going to kill you.

Or you can look into some time management resources so that you arrive in time to walk a little extra distance. Wouldn’t you rather be a little late and be super healthy and fit? Another rhetorical question.

Of course you would!

Now park as far away as possible and get to walking..

31 Days To A Much Improved You – Tip #9 Add These Four Core Exercises

Plank

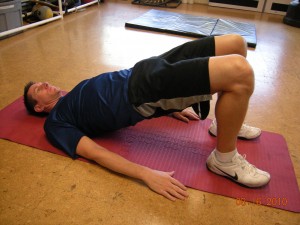
Bridge

Bridge

The Bridge is a great core exercise. It helps to strengthen the hamstrings, gluteals, and all of the muscles that support the lower spine and pelvis. This picture shows the end position of the bridge. To start you want to lye flat on the ground, bend your knees to about 90 degrees. Then press through your heels and lift your hips toward the ceiling. The goal is to lift your hips high enough so that there is a straight line through your knees, hips and shoulders. Hold for 30-60 seconds and repeat 3 times.


Plank

Plank 

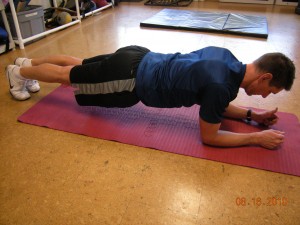
The Plank is a core exercise that is rooted in Yoga. It helps to strengthen all the muscles that stabilize the spine and pelvis as well as the shoulder. Start by lying flat on the ground. Your elbows should be directly under your shoulder and your feet should be together with your weight on your toes. Lift your hips up so that only your toes and elbows (forearms too) are on the ground. Lift your hips until there is a straight line through your shoulders, hips, knees and ankles.  The weight of your body should be directly over your elbows and toes. You should avoid pressing forward on your elbows or backward on your toes. Also avoid “A-framing” (hips too high) or “Sagging” (hips too low). Hold this position for as long as you can. Repeat 3 times.


Pointer

Pointer 

This is called a pointer because when you perform it you look like a pointer dog. Start on your hands and knees with your hands directly under your shoulders and your knees directly under your hips. Lift your right hand and left knee one inch of the ground. Hole this position while attempting to avoid any movement in the rest of your body. Take 4 seconds to slowly extend both your arm and leg simultaneously. Then take 4 seconds to return them to the start position (with out touching your hand and knee to the ground). Do 8-12 Repetitions on each side.


Boat Pose

Boat Pose 

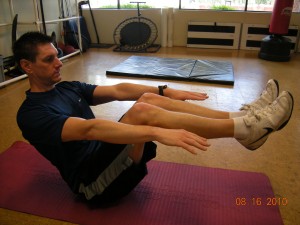
The Boat Pose is also rooted in Yoga. I typically call this Coccyx Balance, because your coccyx bone is your tailbone. Balance on your tailbone lift your feet so that your shins are parallel to the ground. Your arms should be by your side, also parallel to the ground. Lift your sternum (breast bone), so that your spine is flat. Hold as long as you can. Repeat 3 times.


Add theses four core exercises to your daily routing. Do them everyday. Watch the video below to learn more about how to perform these exercises correctly. I’ll be back tomorrow with Tip #10


[youtube]http://www.youtube.com/watch?v=4Djq1SjwlW0[/youtube]

Fitness Tip #8 of #31 Eliminate The Excuses

Congratulations! We’ve completed the first week Of “31 Days To A Much Healthier you”. At this point you should be doing all of the following each and every day: walking an hour, drinking a gallon of water, doing your 4 introductory stretches, as well as journaling your experiences. How’s it going? OK, rhetorical question, I know you’re rocking it and already beginning to notice some benefits!

But the truth is a vast majority of people quit their new exercise or diet programs during the first week. I don’t want you to be that person. I want you to succeed! One of the biggest obstacles you’ll faceis the idea that a diet or workout program is temporary. You have those ideas because that is how the fitness and diet industries promote their programs. You see it all the time, things like, “lose 15 pounds in 15 days” or “Sign up today for our 21 day fat burning miracle workout”. The fact is those programs work great, for some. They work for the people who are selling them to you! They make billions of dollars every year selling them, but they don’t work for you. In fact they set you up for failure, so that you can come back again and buy their next program.

I think I was very clear when I introduced this 31 Day program not to look at day 31 as the end of the journey. But instead you should look at day 32 as the start of you being empowered with tons of new information and habits you can use for the rest of your life. You’ll need to make changes in your daily behavior if you want to make changes in your life. Anything short of that simply won’t work. That may not sound as fun and exciting as all the other programs out there. But it’s the truth! And those other programs are ripping you off!!!

So when you’re faced with the task of actually changing your behavior, is your first reaction to resist that change? Are you uncomfortable with making changes and doing things differently than you have in the past? Does it seem overwhelming and unachievable? If you have any of these feelings or thoughts, the first thing you are going to do is come up with excuses why it won’t work for you.

Excuses will get in the way of accomplishing anything, every time.

As soon as you have those thoughts or feelings, squash them! Stop them immediately, and find solutions instead. Now this will be a process for you, part of the journey. It’s ok that you have these thoughts and feelings. The goal for you is to be able to recognize them and begin to change the way you are thinking. As soon as you recognize that you’re making an excuse, start to find the solutions.

Sometimes it will be very easy. If you’re saying to yourself that you’re too tired to workout, just go workout anyways, you’ll feel better. Now if you’re too tired because you stayed up late (watching TV, playing video games, or on FaceBook).You simply need to reprioritize, put your health ahead of those things and go to sleep earlier.

See how easy this is?

Ok, here’s the deal, from now on NO MORE EXCUSES, ONLY SOLUTIONS! Get to it…

See you again tomorrow…

31 Days To A Much Improved You Fitness Tip #5 Add These Four Stretches To Your Daily Routine

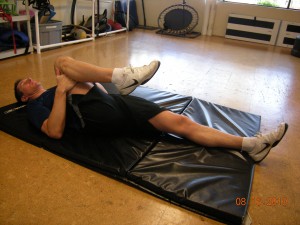
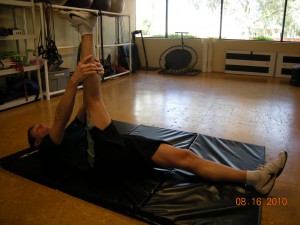
Finish Position For Lying Hamstring Stretch

Lying Hamstring Stretch

Lying Hamstring Stretch - Start

Start Position For Lying Hamstring Stretch

Finish Position For Lying Hamstring Stretch

In the start position you want to lye flat on your back with your left leg relaxed on the ground. Grab behind your right knee with both hands and pull your knee toward your chest. Hold for 30 to 60 seconds. After 30-60 seconds straighten  your right leg, grab your calf and pull your leg toward your body. You’ll feel a stretch in your hamstring (the back of your leg). Hold for 30-60 seconds. Repeat with your left leg. Do 2-3 stretches for each leg.

[Read more…]

Copyright 2013 - Fintess Know How Headquarters